
Hailstorms affect thousands of homeowners every year. Whether it’s a series of light hailstorms over time that quietly chip away at your roof’s integrity or a single, powerful storm that leaves no doubt about the damage, hail can significantly impact the lifespan and performance of your roof. At Browns Roofing, we’ve seen it all, and we’re here to guide you through the steps to protect your home and make informed decisions when working with roofing professionals.
The Impact of Hail on Your Roof
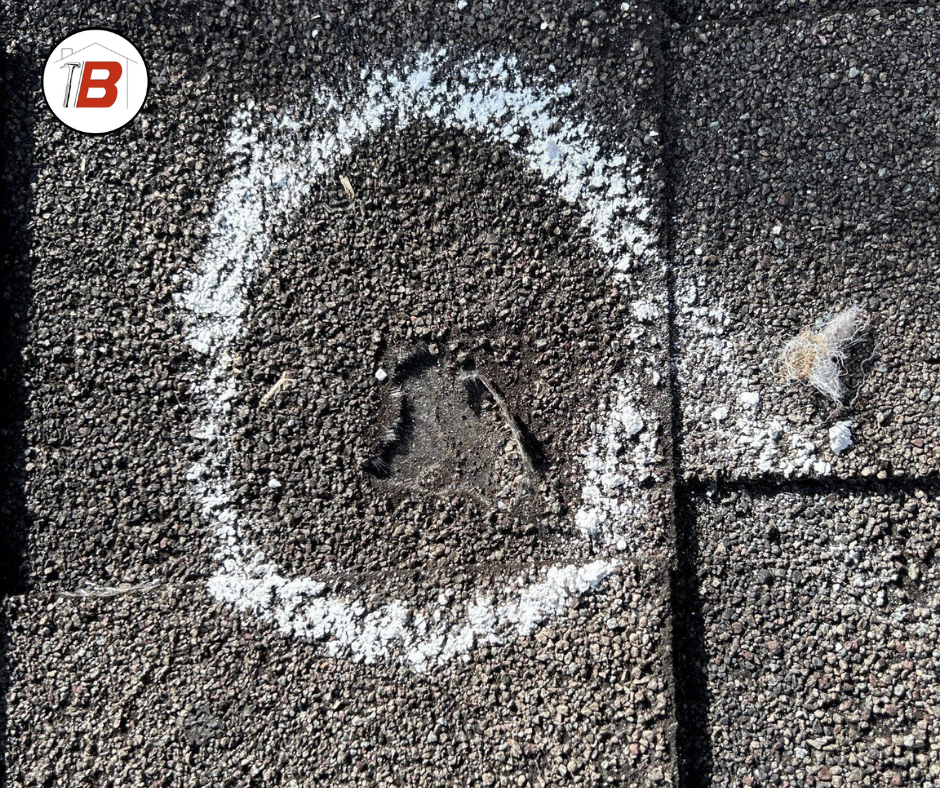
Hail damage doesn’t always look dramatic at first glance. Small hail impacts can go unnoticed, especially on black shingles, where damage is particularly hard to see from the ground. Over time, these seemingly minor dents can expand and contract with weather cycles, leading to degranulation (the loss of protective granules on shingles) and moisture intrusion. Left unchecked, this can result in leaks, mold, and structural damage.
On the other hand, a major hailstorm can leave visible dents, broken shingles, and even expose the underlayment. Regardless of the severity, it’s crucial to act quickly and follow a clear plan to address the damage.
Step 1: Call a Professional Roofing Contractor
The first step after a hailstorm is to call a professional roofing contractor for an inspection. Hail damage cannot be accurately assessed from the ground. A trained roofer will climb onto your roof, inspect for damage, and identify issues that may not be immediately visible, such as cracks, bruised shingles, or compromised flashing.
At Browns Roofing, we specialize in thorough roof inspections and have extensive experience working with both residential and commercial properties. Our team knows what to look for and can provide a detailed assessment of your roof’s condition.
Step 2: Don’t Delay—Act Quickly
Time is of the essence when it comes to hail damage. Many insurance policies have strict timelines for reporting claims, and delaying repairs could result in denied coverage. Even if the damage seems minor, it’s better to address it sooner rather than later. Waiting for a more “convenient” time could lead to more extensive damage and higher repair costs.
Step 3: Complete Temporary Repairs
If your roof has been compromised, it’s your responsibility as a homeowner to mitigate further damage. This might include boarding up broken windows, placing tarps over exposed areas, or smoothing out the fins of roof ventilation turbines to prevent moisture intrusion. Most insurance policies require homeowners to take these steps to prevent additional damage while waiting for an insurance adjuster.
Step 4: Verify the Contractor’s Credentials
Not all roofing contractors are created equal, and it’s essential to do your homework before hiring one. Here’s what to look for:
- Google Business Profile: Google reviews are a reliable source of credibility. Unlike other platforms, Google reviews cannot be easily manipulated or removed, making them a trustworthy resource for evaluating a contractor’s reputation.
- Licensing: In Louisiana, roofing contractors must hold a valid roofing license as of 2026. A home improvement license is no longer sufficient for insurance claims or retail roofing work. Use the Louisiana Contractor Board Contractors Search App to verify a contractor’s licensing status.
- Financial Standing: Check with the contractor’s supply house representative (e.g., ABC Supply, Beacon Building Products, or SRS Distribution). A reputable contractor will have a good relationship with their suppliers and be in good financial standing. This ensures they can handle high-volume work during storm seasons without leaving homeowners with unpaid material bills or liens on their property.
Step 5: Choose a Contractor Who Advocates for You
A good roofing contractor will do more than just repair your roof—they’ll advocate for you during the insurance claims process. Before meeting with your insurance adjuster, select a contractor who understands local building codes and permitting requirements. In Louisiana, new permitting and compliance laws (House Bill 85 Act 239) went into effect on January 1, 2026, so it’s crucial to work with a contractor who is up-to-date on these changes.
Your contractor should attend the adjuster meeting to ensure that all damage is documented and that your claim includes code-compliant coverage. This can make a significant difference in the quality and longevity of your roof repair or replacement.
Step 6: Understand Your Insurance Policy
Insurance policies can be complex, and recent changes in the industry have made it even more important for homeowners to understand their coverage. Many policies now include exclusions for code upgrades or switch from Replacement Cost Value (RCV) to Actual Cash Value (ACV) after a certain number of years. This means you may need to pay out of pocket for certain repairs or upgrades.
While your contractor can’t interpret your policy or resolve coverage gaps, they can help you navigate the claims process and ensure that all necessary repairs are included in your claim.
Step 7: Sign a Formal Contract
Before any work begins, make sure you have a signed contract in place. This document should outline the scope of work, payment terms, and cancellation policies. Avoid giving any deposits or advances without a formal contract. In most cases, a deposit is required to make the contract legally binding, and additional payments may be due upon material delivery.
A clear contract protects both you and the contractor, ensuring that everyone is on the same page and that the project runs smoothly.
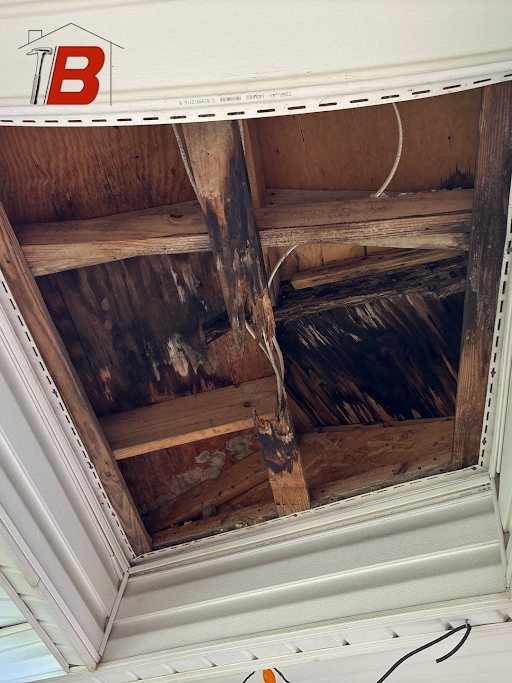
Step 8: Conduct an Attic Inspection
Before nailing shingles onto your roof, it’s essential to inspect the attic. AC lines, electrical conduits, and water lines often run through the attic and may be in contact with the roof deck. While roofers can’t guarantee these lines won’t be affected, a thorough inspection can help identify potential issues and prevent damage during the roofing process.
Step 9: Submit Documentation to Your Mortgage Company
If your insurance check includes your mortgage company as a payee, you’ll need to submit the necessary documents for endorsement. Keep copies of all checks, scans, and documents, as checks can get lost in the mail. Ensure all payees, including separated spouses if applicable, endorse the checks to avoid delays.
Step 10: Complete Repairs Within Policy Timelines
Insurance claims often have strict timelines for completing repairs and submitting proof of work. The most common timeline for releasing recoverable depreciation is one year from the date the claim was filed. Ensure you work with your contractor to meet these deadlines and provide all required documentation, including proof of deductible payment.
Step 11: Explore Hail-Resistant Shingle Options
If you’re replacing your roof, consider upgrading to Class III or IV hail-resistant shingles. These materials can provide better protection against future storms and may qualify you for insurance discounts. Check out Browns Roofing’s article on shingle selections for more details. (Add Roofle Link OR reference Hail resistant articles already written)
Why Choose Browns Roofing?
With locations in Baton Rouge, Shreveport, Monroe, and Little Rock, Browns Roofing is a trusted name in the roofing industry. Our commitment to honesty, forward-thinking solutions, and a standard of excellence sets us apart. We’re not just here to fix roofs—we’re here to build lifelong relationships with our customers and make a positive impact on our community.
Final Thoughts
Hail damage is a serious issue that requires prompt attention and the expertise of a professional roofing contractor. By following these steps and working with a reputable company like Browns Roofing, you can protect your home, navigate the insurance process, and ensure a high-quality repair or replacement.
If your roof has been damaged by hail, don’t wait—contact Browns Roofing today for a free inspection. Let us help you restore your roof and your peace of mind. Call or visit our website to schedule your consultation.